
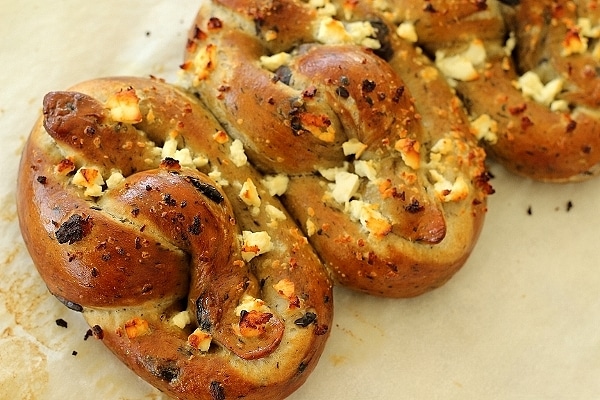
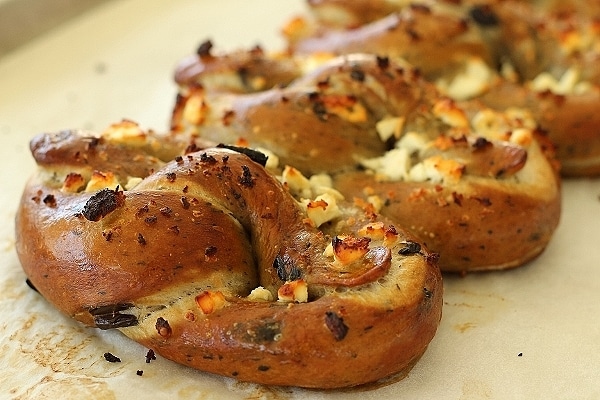
These homemade Olive and Garlic Soft Pretzels are out of this world! Add crumbled feta cheese over the top, and you've got a delicious Mediterranean flavor profile for your chewy German/American pretzels. They are absolutely worth the effort, and truly surpass any other recipe for traditional soft pretzels.
I have had my share of disappointing soft pretzels from street vendors. They're usually stale and dry. I've determined that making them yourself is definitely the way to go. I have also fallen in LOVE with the pretzel bread at Le Cellier at Disney World, which revolutionized my view on eating pretzels... with BUTTER! Who knew?!
Fun Facts about Pretzels
Apparently slathering butter on pretzels is common practice in Germany. This is where pretzels as we know them became popular and the standard "bread," just as baguettes are in France.
Apparently the shape of pretzels derived from religious symbolism and was meant to depict a child's arms crossed over his chest in prayer (as they did back in the day). It's also believed that the 3 openings in a standard pretzel represent the Holy Trinity. Who knew that eating pretzels could be considered a religious experience?!
There are some mixed stories about how pretzels were introduced to the world and how they developed into modern day versions of themselves. All of this fascinating information is found in Pretzel Making at Home by Andrea Slonecker. I thought I knew pretzels until I read this book. I then discovered there is so much untapped information (and variations) on pretzels that I'm only now discovering.
Review of Pretzel Making at Home
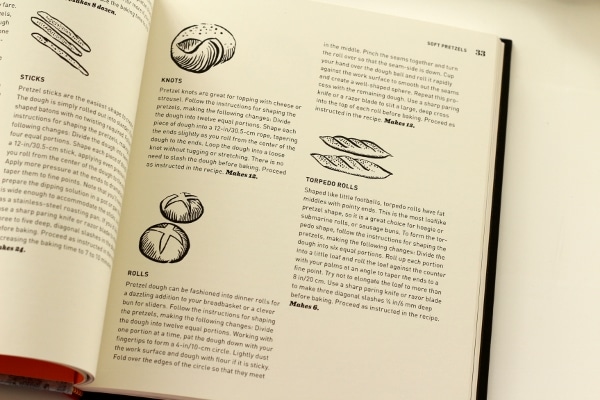
For anyone wishing to explore pretzels outside of the heated plexiglass case where they are commonly found in America, check out this book. From classic recipes for soft and hard pretzels, to flavor variations for the dough, topping suggestions, and a dozen different shapes to try out, this book starts off on the right foot.
Furthermore, a myriad of other recipes infuse pretzels into never-before-scene scenarios. These definitely round out this single-subject book into one that's worth picking up. Recipes like Philly Cheesesteak Pretzel Pockets, Pretzel Bread Pudding with Salted Caramel Sauce, Pretzel-Dusted Calamari with Mustard Aioli and Pretzel Ice Cream definitely think outside of the pretzel box.
A chapter dedicated to sauces and dips is a great finishing touch. It includes condiments such as Sweet Bavarian Mustard, Apricot-Riesling Mustard, Beer Cheese Fondue, and homemade Nacho Cheese, among many others. I love both mustard and cheese with my pretzels, but have also jumped on the cold-butter-melting-on-warm-soft-pretzels bandwagon. It's worth a try! Trust me!
How did the soft pretzels turn out?
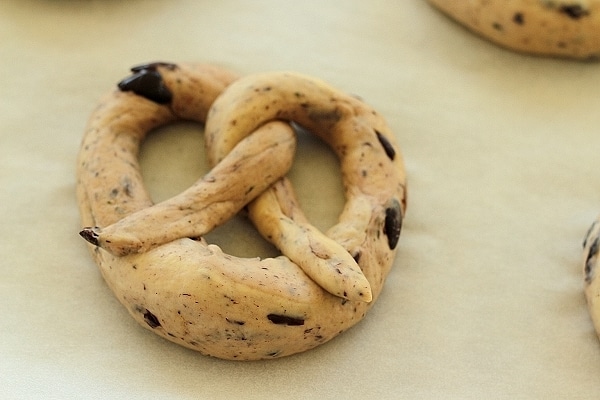
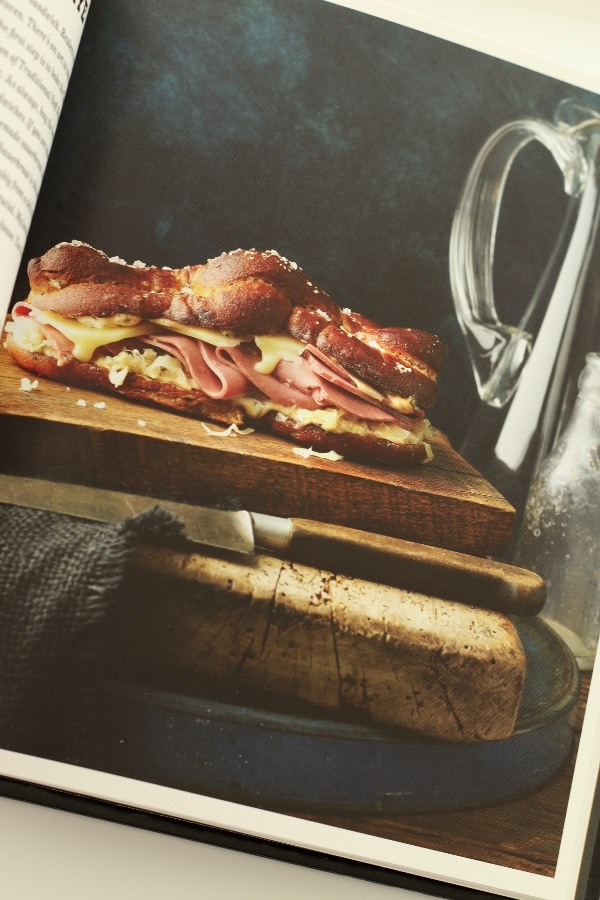
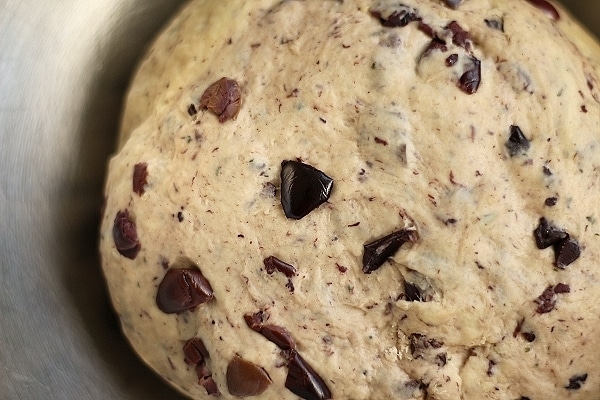
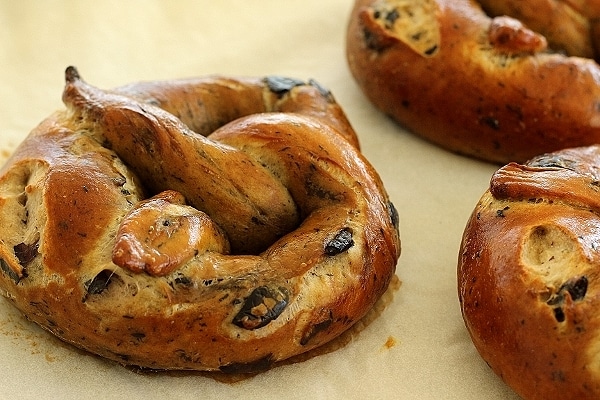
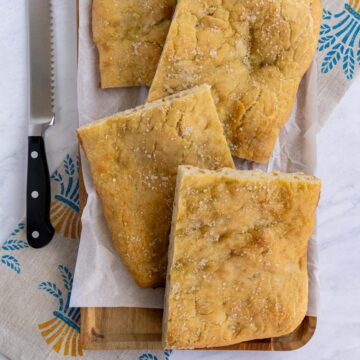
Although there are a lot of recipes to choose from, I decided to start fairly basic by simply making soft pretzels. I did decide, however, to spice it up a bit. To enhance the simple dough, I made one of the creative variations for olive and garlic soft pretzels. I also decided to try two different shapes with the dough. I used half of the dough to make Philadelphia style pretzels. With the other half I made the traditional Swabian shape. This differs from the New York style by featuring a fat "belly" and tapered, crispy "arms."
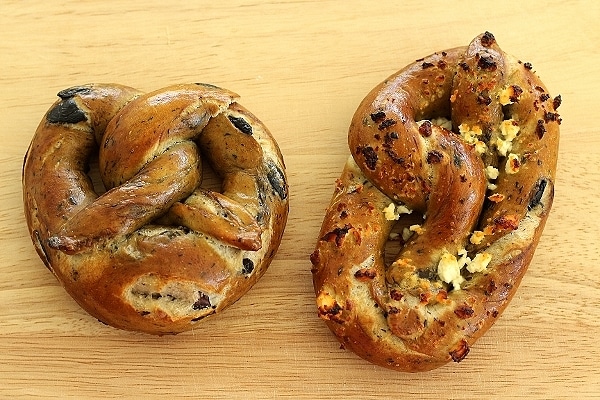
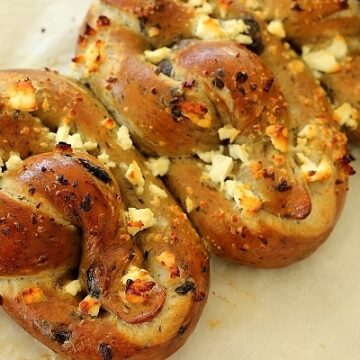
My "arms" didn't turn out as thin and crispy as they should have been (need to taper them more next time), but at least I got the "belly" part down! I also decided to top half the pretzels with crumbled feta cheese, and leave the other half plain. Adding the feta is definitely the way to go! It just adds an additional layer of flavor to these Mediterranean inspired pretzels.
How far to plan ahead when making soft pretzels?
Slonecker recommends making your pretzel dough a day in advance so it matures slowly in the refrigerator overnight and develops more flavor. She offers a quick pretzel alternative for anyone who didn't plan in advance, although the flavor will not develop as much. Unless you're pressed for time (and if you were, why would you make homemade pretzels from scratch?) I would recommend spanning the process over two days.
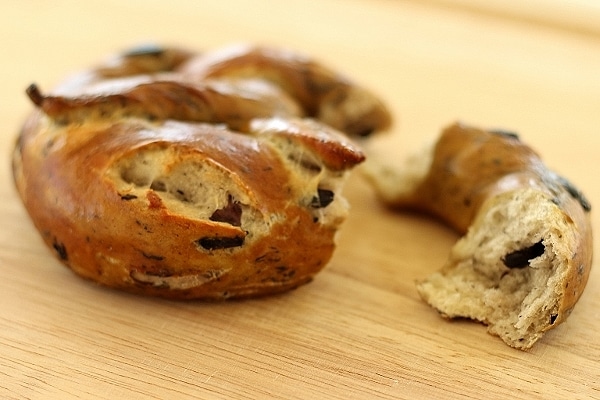
These pretzels turned out fantastic! They were soft and chewy with beautifully developed flavor. My Philadelphia-born brother-in-law gave them a solid two thumbs up, while my best friend claimed they were the best pretzels she has ever had. Pretty high marks!
I will steadfastly return to this recipe (and others in the book) for future pretzel-making needs (and let me tell you, you NEED to try these pretzels). The recipe seems long, but only because it's thoroughly instructive. It's really not challenging and the results speak for themselves! Delicious!!
I also think it would be really fun to make homemade pretzels with kids, especially the rolling/shaping part.

Other recipes you may like
- Homemade Naan
- Za'atar Manakish (Lebanese Za'atar Bread)
- Guinness Bread
- Pão de Queijo (Brazilian Cheese Bread)
Tried this recipe? Please leave a star ⭐️⭐️⭐️⭐️⭐️ rating in the recipe card below and/or a review in the comments section further down the page. You can also follow me on social media on Facebook, Instagram, and Pinterest!
Olive and Garlic Soft Pretzels with Feta Cheese
Ingredients
- 2 ¼ teaspoons (one ¼-ounce / 7-grams package) active dry yeast
- ½ cup (120 ml) warm water between 100 and 115°F / 38 and 45°C
- 1 tablespoon barley malt syrup or 1 tablespoon firmly packed dark brown sugar
- 3 ¼ cups (420 grams) unbleached bread flour
- ⅓ cup (75 ml) cold pilsner-style beer
- 2 tablespoons unsalted butter cubed, at room temperature, plus more for greasing the bowl
- 2 teaspoons fine sea salt such as fleur de sel or sel gris
- ½ cup (100 grams) well-drained pitted and roughly chopped kalamata olives
- 1 tablespoon minced garlic
- 1 tablespoon chopped fresh thyme
- 2 tablespoons food-grade lye or ¼4 cup (60 grams) baked baking soda see notes below
- 1 cup (150 grams) crumbled feta cheese
Instructions
- Sprinkle the yeast over the warm water in the bowl of a stand mixer or in a large bowl. Add the barley malt syrup, stirring until it is dissolved. Allow the yeast to bloom until it is foamy, 5 to 7 minutes. Add the flour, beer, butter, and fine sea salt and stir to form a shaggy mass. Add the olives, garlic, and thyme. Attach the bowl and the dough hook to the stand mixer and begin kneading on medium-low speed. After about 1 minute the dough will form a smooth ball. The dough should be quite firm and may be slightly tacky, but not sticky. (If it is sticky, add a little more flour, about 1 tablespoon at a time, and knead it in until the dough is smooth. If the dough is too dry to come together, add more water, 1 tablespoon at a time.) Continue kneading the dough on medium-low speed until it is elastic, 5 to 7 minutes. Alternatively, turn the shaggy dough out onto an unfloured work surface and knead it by hand.
- Choose a bowl that will be large enough to contain the dough after it has doubled in size, and lightly grease it with butter. Transfer the dough to the greased bowl and cover the bowl tightly with plastic wrap. Put the dough in the refrigerator to rise for at least 8 hours, and up to 24 hours, for optimal flavor.
- For quick pretzels, allow the dough to rise at room temperature (in a warm spot) until it has doubled in size, about 1 ½ hours.
- Line two 12-by-17-inches / 30.5-by-43-cm rimmed baking sheets with parchment paper; set aside.
- Turn the dough out onto an unfloured work surface and press it down to deflate. To form the classic pretzel shape, cut it into eight equal portions. Work with one piece of dough at a time and keep the rest covered with a damp, clean kitchen towel. Pat a piece of dough down with your fingertips to form a rough rectangle about 3 ½-by-5 ½-inches. Beginning on a long side, roll it up tightly, forming it into a little loaf. Pinch the seam together. Shape the dough into a rope by rolling it against the work surface with your palms and applying mild pressure, working form the center of the dough out to the ends. If you need more friction, spray the counter with a little water from a squirt bottle or drizzle a few drops of water and spread it with your hand. Once you can feel the dough rope doesn't want to stretch any farther (usually when it is between 12 and 16 inches), set it aside to rest and begin shaping another piece in the same manner. Repeat this process with the remaining pieces of dough.
- Return to the first dough rope and continue rolling it out to a length of 24 to 28 inches leaving the center about 1 inch in diameter and tapering the ends thinly by applying a little more pressure as you work your way out. Position the dough rope into a U shape, with the ends pointing away from you. Holding an end in each hand, cross the ends about 3 inches from the tips and then cross them again. Fold the ends down and press them into the U at about 4 and 8 o'clock, allowing about 1⁄4 inch of the ends to overhang. Place the pretzel on one of the prepared baking sheets and cover it with a damp towel. Repeat this process with the remaining dough, arranging the pretzels at least 1 inch apart and covering them with a damp towel.
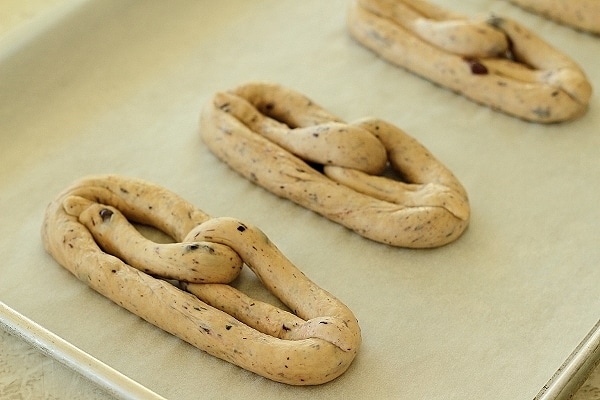
- Alternatively, to make Philadelphia style pretzels, shape each portion into a 26 inch rope, applying even pressure as your roll from the center and avoid tapering the ends. Shape the pretzel into the classic pretzel shape, but attach the ends of the rope to the U at 3 and 9 o'clock. Pull the sides of each pretzel out to elongate the pretzel into an oval shape resembling an infinity sign.
- Allow the covered pretzels to rise at warm room temperature until they have increased in size by about half, 20 to 30 minutes. The pretzels can be refrigerated at this point, covered tightly with plastic wrap, for up to 8 hours before dipping and baking them.
- At least 20 minutes before baking, position one rack in the upper third and another rack in the lower third of the oven and preheat it to 500°F/260°C/gas 10.
- Use the lye solution or baked baking soda solution (see below). Use a large skimmer to gently dip the pretzels in the lye or baked baking soda solution, one or two at a time. Leave them in the solution for about 20 seconds, carefully turning them once after 10 seconds. Remove the pretzels from the liquid, drain, and return them to the baking sheets, spacing them at least 1 inch apart (if making Philadelphia style pretzels, arrange a chain of four pretzels on each baking sheet so they are touching). If the ends become detached, simply reposition them. Repeat with the remaining pretzels.
- Use a sharp paring knife or razor blade to cut a slit about ¼ inch deep in the thickest part of each pretzel (skip this step for Philadelphia style pretzels). If using baked baking soda solution, brush pretzels with egg wash (see below). Top pretzels with crumbled feta.
- Bake the pretzels until they are deep mahogany in color, 8 to 12 minutes, rotating the pans from front to back and top to bottom halfway through the baking time. Transfer the pretzels to a rack to cool for 10 minutes before serving. The pretzels are best enjoyed the day they are made, ideally warm from the oven or within an hour of being baked.
- To store the pretzels, allow them to cool completely and then wrap each one individually in plastic wrap. Store them at room temperature for up to 2 days, or put the plastic-wrapped pretzels in a resealable plastic freezer bag and freeze them for up to 1 month. Reheat the pretzels in a 350°F/180°C/gas 4 oven for about 5 minutes, or for 10 to 12 minutes if frozen.
Notes
Nutrition
*All nutritional information is based on third-party calculations and should be considered estimates. Actual nutritional content will vary with brands used, measuring methods, portion sizes and more.*
*Disclaimer* I received no compensation to write this review other than a free copy of the book. My opinions are always my own.


Camille says
Everything about these look so good! I can't wait for you to make them for me! Or to try them on my own!! :o)