Homemade Udon Noodles
Homemade Udon Noodles are surprisingly easy and fun to make, and yield amazing results. They only require 3 basic ingredients, and the finished results can be enjoyed in countless delicious ways.
Servings: 6 servings
Calories: 367kcal
Ingredients
- 600 grams (4 ¾ cups plus 1 tablespoon) all-purpose flour plus more for dusting and tossing
- 25 grams kosher salt (3 tablespoons Diamond Crystal brand or 1 ½ tablespoons Morton brand)
- 1 ¼ to 1 ½ cups filtered water
Instructions
- Combine the flour and salt in a large mixing bowl, stir, then add 1 ¼ cups of the water. Use your hands to mix until the dough starts to come together in shaggy mass.
- Start to firmly press and knead the dough, incorporating the loose flour until there’s none left. If necessary, add a little more water, 1 tablespoon at a time, until you can incorporate all of the flour. The dough should be very firm and still seem a little dry.
- Form the dough into a ball and place it inside a large 2-gallon Ziploc bag (or divide the dough in half and place one half in a 1-gallon Ziploc bag and do the following steps in batches with each half of the dough). Seal the bag leaving a small air gap at one end so air can still circulate as needed.
- Loosely wrap the bag in a kitchen towel and place it on the floor. Step on the bag with the dough inside and use your weight to flatten the dough. Use a rolling motion with your feet going from your heels to your toes, step on the dough about 50 times, rotating your body a few times to step evenly over all the dough. It will flatten out inside the bag.
- Carefully remove the flattened dough from within the bag (it may be a little stuck but just gently release it). Fold the dough into thirds and then fold it in half to make a square. Press to gently flatten, and then return the dough to the bag. Repeat the process of kneading with your feet (about 50 steps each) and then folding the flattened dough 2 more times. It should be a lot softer and more pliable than before.
- Remove the flattened dough from the bag after 3 times of kneading with your feet. If you had to split the dough in half to knead it in a smaller bag, repeat with the other half of the dough. Then place both halves of flattened dough on top of each other on your work surface, press gently to adhere them together. Fold the edges underneath to form it into a single large smooth ball of dough. Return the ball of dough to the Ziploc bag, seal it and let it sit at room temperature for 2 hours in summer or 3 hours in winter to allow the gluten to relax.
- On a floured surface with ample room, place the ball of rested dough and lightly dust the top with flour. Use a rolling pin to roll the dough, lightly dusting with flour if it threatens to stick to the pin or board, into a rough rectangle about ⅛-inch thick (mine was about 18 ½-by-13 ½-inches). If you are having difficulty rolling, allow the dough to rest for 5 to 10 minutes as needed. This allows the glutens to relax and make it easier to roll out out.
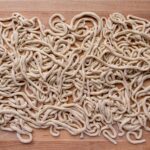
- Lightly dust the top again with flour, and then fold the dough into thirds to create a long strip. Slice into approximately ⅛-inch-wide noodles. Gently separate the noodles and toss them with flour so they don’t stick together. Cook or freeze immediately.
- To cook homemade udon: The way you cook homemade noodles is slightly different from the way you cook purchased noodles (which are already parboiled). Follow these instructions whether you’re planning to serve the noodles hot or cold.
- Bring a large pot of water to a boil and prepare a large bowl of icy water. Add the noodles to the boiling water, stirring frequently and adding ¼ cup of fresh water if the water threatens to bubble over, until they’re fully cooked but not mushy, 10 minutes. (Unlike Italian pasta, they shouldn’t be al dente, but don’t let them get mushy.)
- Drain the noodles, then transfer them to the icy water. Briefly and gently rub them with your hands to remove some of the starch. Drain very well.
Notes
- Portion out and freeze flour-dusted uncooked noodles for up to 1 month in a freezer-safe bag. Boil frozen uncooked udon (without thawing) for 12 minutes instead of 10 minutes. You can also boil, portion, and cool noodles, then freeze the pre-cooked noodles for 1 month in a freezer-safe bag.
- If you're not freezing the fresh udon noodles, it's best to boil them shortly after making them, rather than refrigerating the uncooked noodles. Pre-cooked noodles will last for about 5 days in the fridge. To eat, just refresh them in boiling water for a minute or two, drain, rinse, and use.
- For best results, use a kitchen scale! This is one of my favorite kitchen tools, and it definitely helps with the accuracy in measuring the flour for homemade udon noodles.
- This homemade udon noodle recipe yields about 950 grams of raw udon noodles. After boiling and draining, this results in about 1550 grams of cooked udon noodles.
- Assuming that roughly 500 grams of cooked udon noodles is 2 servings, then this entire recipe yields 6 servings. In this case, 1 portion uncooked is 150 to 160 grams and 1 portion cooked is about 250 to 260 grams. Therefore, cook about 300 to 320 grams of raw udon noodles to yield approximately 500 grams of cooked noodles when a recipe calls for that. You can divide up your noodles accordingly.
- Adapted from Mastering the Art of Japanese Home Cooking
Nutrition
Calories: 367kcal | Carbohydrates: 73g | Protein: 13g | Sodium: 533mg | Fiber: 3g | Sugar: 3g