Buffalo Chicken Dumplings
A totally American spin on Asian dumplings, these chewy morsels are filled with spicy Buffalo chicken and served with a blue cheese dipping sauce.
Servings: 32 dumplings, serving 4 as a main course, or 6 to 8 as a snack or starter
Calories: 41kcal
Ingredients
Filling:
- 8 ounces skinless, boneless chicken breast or thighs
- 1 stalk celery finely chopped
- ¼ cup hot sauce preferably Frank’s Red Hot (or more if you want them seriously spicy)
- 1 teaspoon kosher salt
Dough:
- 10 ounces (285 grams / 2 cups) all-purpose flour
- About ¾ cup just-boiled water (boil water, then let it sit for a minute off the heat before measuring)
Cooking & Serving:
- Vegetable, canola or peanut oil for pan-frying
- Blue cheese dressing for serving
- Celery sticks for serving
Instructions
- To make the filling: first mince the chicken by pulsing it in a food processor until it’s fine with small chunks but not a puree. Transfer the minced chicken to a mixing bowl. Add the remaining filling ingredients to the mixing bowl. Stir in one direction for about 2 minutes or until all ingredients are uniform and liquids are completely absorbed by the meat. Refrigerate the filling until needed.
- To make the dough: place a large mixing bowl over a damp paper towel on your work surface, to keep in place while mixing. Add the flour and make a well. Use a wooden spoon to mix the flour while you add the water in a steady stream. Mix together until you have a lot of lumpy bits, then knead the hot dough in the bowl until the dough comes together. Add water by the teaspoon if the dough does not come together.
- Continue kneading the dough on a lightly floured surface (only flour if necessary, and do so sparingly) for a couple more minutes until the dough is smooth and elastic (my mixing bowl was very large so I finished kneading directly in the bowl and it was just fine). The dough should bounce back when pressed with your finger, but leave a light impression of your finger. Place dough in a zip-top bag, seal tightly, pressing out excess air, and set aside at room temperature for 15 minutes up to 2 hours. The dough will steam up the bag and soften. After resting, the dough can be used right away, or refrigerated overnight and returned to room temperature before using.
- To assemble the dumplings, remove the dough from the bag, turning the bag inside out if the dough is sticky. Put the dough on a lightly floured surface and cut it in half. Put half back in the bag, squeezing out the air and sealing it closed to prevent drying.
- Roll the dough into a 1-inch-thick log and cut into 16 pieces (cut in half, then cut each half in half, and so on to create pieces that are even in size. The tapered end pieces should be cut slightly larger). If your pieces are oval, stand them on one of the cut ends and gently squeeze with your fingers to make them round, like a scallop. Take each piece of dough and press each cut end in flour, lightly pressing the dough to about ¼ inch thick and set aside.
- Next, flatten each dough disk into a thin circle, about ⅛ inch thick, either with a tortilla press (lined with plastic wrap), or with a heavy flat-bottomed object like a frying pan (also lined with plastic). Alternatively, use a dowel (which is a good lightweight rolling pin alternative for fast and flexible dumpling making) to lightly roll out each disc into an ⅛ inch thick circle.
- To finish the wrappers, place wrappers one at a time on your work surface, and flour only if sticky. Imagine a quarter-size circle in the center of the dough. This is what the Chinese call the “belly” of the wrapper. You want to create a wrapper that is larger than its current size, but still retaining a thick “belly” in the center. This ensures an even distribution of dough when the dumpling is sealed. Use the rolling pin to apply pressure to the outer ½-to-¾-inch border of the wrapper. Roll the rolling pin in short downward strokes with one hand while the other hand turns the wrapper in the opposite direction. Aim for wrappers that are about 3 ¼ inches in diameter. When a batch of wrappers is formed, fill them before making wrappers out of the other portion of dough.
- Line a baking sheet with parchment paper (if planning to refrigerate dumplings for several hours, also dust with flour to prevent sticking). Hold a wrapper in a slightly cupped hand and scoop about 1 tablespoon of filling slightly off-center toward the upper half of the wrapper, pressing and shaping it into a flat mound and keeping a ½-to-¾-inch border on all sides.
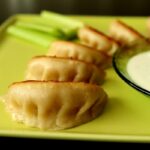
- To make “pleated crescent” shapes (as photographed), make the first pinch between index finger and thumb, then fold over the front edge to form the first pleat and press it against the back edge. Continue pleating the dough in this fashion until making the final pleat and then settle the dumpling on a work surface and press the edges to seal well.
- Alternatively, to make “pea pod” shapes, fold the edge of the wrapper closest to you to meet the top edge and pinch together to seal well. Place on your work surface and press gently to steady the dumpling and make it sit flat. Fold the sealed edges of the dumpling to make a series of pleats from one end to the other.
- Place finished dumplings on the prepared baking sheet. Repeat with the remaining wrappers and dough, spacing out dumplings about ½ inch apart. Keep the finished dumplings covered with a dry kitchen towel.
- When all the dumplings are assembled, they can be covered with plastic wrap and refrigerated for several hours and can be cooked straight from the refrigerator. For longer storage, freeze them on their baking sheet until hard (about 1 hour), transfer to a zip-top freezer bag, pressing out excess air before sealing, and frozen for up to 1 month. To cook after freezing, partially thaw, using your finger to smooth over any cracks that may have formed during freezing, before cooking.
- To pan-fry the dumplings, use a medium or large nonstick skillet (or cook two batches at the same time using two pans). Heat the skillet over medium-high heat and add 1 ½ tablespoons oil for a medium skillet and 2 tablespoons for a large one. Place the dumplings 1 at a time, sealed edges up, in a winding circle pattern. The dumplings can touch. Medium skillets will generally fit 12 to 14 dumplings, large skillets will fit 16 to 18 dumplings. Fry the dumplings for 1 to 2 minutes until they are golden or light brown on the bottom.
- Holding the lid close to the skillet to lessen splatter, use a measuring cup to add water to a depth of roughly ¼ inch (about ⅓ cup water). The water will immediately sputter and boil vigorously. Cover with a lid or aluminum foil, lower the heat to medium, and let the water bubble away for 8 to 10 minutes, until it is mostly gone. When you hear sizzling noises, remove the lid as most of the water is now gone. Let the dumplings fry for another 1 or 2 minutes, or until the bottoms are brown and crisp. Turn off the heat and wait until the sizzling stops before using a spatula to transfer dumplings to a serving plate. Display them with their bottoms facing up so they remain crisp.
- Serve with blue cheese dressing in a communal bowl or in individual dipping sauce dishes, along with some fresh, crisp celery on the side. Enjoy!
Notes
Dough and Assembly from Asian Dumplings
Nutrition
Serving: 1dumpling | Calories: 41kcal | Carbohydrates: 7g | Protein: 2g | Cholesterol: 6mg | Sodium: 112mg | Potassium: 6mg